|
|
|
|
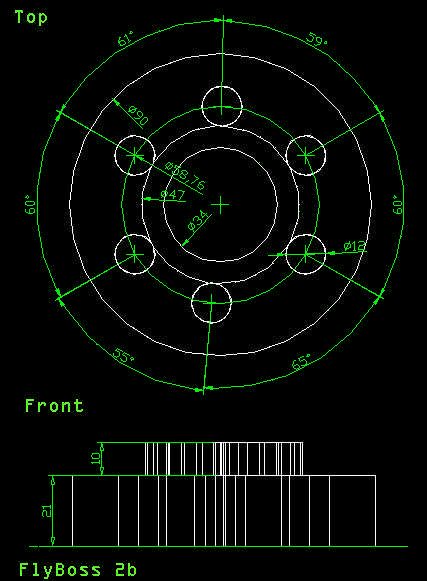
1st November, Hardware. Placed an order yesterday with RPI for piston rings, main & big end bearings, core plugs and gaskets. Guess what ... all the stuff arrived today as promised :-) Conveniently Elaine is buying me this £160 of 'rebuild' parts for my birthday, so as they are a present, they will not need to be added to the project budget, sneaky I know, but the engine does run happily as it is so they are not an essential expense. Also got a cylinder honing tool from RS for £40, ready for some brutal home engineering over the next couple of days. 4th November, Action. Using slightly dodgy 'mad-tech' the bottom of the block had 5mm removed, firstly by drilling about a million 4.8mm deep holes in the base of the block, then by generous angle grinding, then by towing the block about on some flat concrete and finally using the leccy sander on it. Straight edges show it to be flat enough that a spot of orange gasket goo will seal things fine!! Also while feeling brutal I used the honing tool and took the nasty glaze & surface rust from the bores, If you have any mechanical sympathy don't click this link for the pics! 5th November, TEAM Action ! Damian visited today to see if the project was in fact a reality, and not just some silly hoax like the moon landings or alien infiltration etc... The first hour was spent with Damian excitedly running around the garden, prodding bits of engine, exhaust & gearbox and asking about a million questions about what goes where & why. After that he calmed down and said ' I think I have run out of questions now ! ' I guess that after living with the project in my head for a year, I kind of forget that until you actually play with the huge pile of parts & stick them together one at a time, you don't know what other questions you need to ask. - I dunno if that makes sense! Damian seemed keen to get his hands dirty so we had a look at the problem of fitting the starter motor. The diameter of the Princess flywheel is about an inch less than the V8, so the starter motor needs to be moved inwards towards the crank, this causes a problem, because one bank of cylinders is in the way. So the only way is down... The first thing to do was to chop the mounting ring for the starter off of the V8 block, this allows the starter motor do mount flush against the transfer plate. After this the hole in the transfer plate needs to be extended downwards until the starter just clears the cylinders. The starter motor, can sort of bee held in about the right place now, so as soon as the flywheel is fitted to the crank the final position can be determined quite easily. Had a peep at Damian's Imp and gave him a spare Mini front subframe as the basis for his engine mounting & rear suspension. (Don't tell him, but I think that sticking a V8 into an Imp is a silly idea!) Then started the rebuild with new bearings & piston rings. The pistons seemed easier to pop into the bores than when I did Dorisses 'little'1380, but then with 89mm bores it's easy to fit your hand inside the ring compressor ;-) A new adaptor plate was cut to fit between the block & box, so they bolt together in the right place now. 6th November, Action! This morning at 6am I had a fiendish plan for a prototype adopter to see how to fit the Princess flywheel to the V8 crankshaft. Looking at the clutch side of the V8 fly, there is a recess about 20mm deep & about 90mm diameter - about the size of the adapter. Quick rummage through the socket set finds a socket that fits snugly in the center hole, so is the same diameter as the protrusion on the crank tail, then wrapped the flywheel bolts in masking tape & poked them through the holes from the crank side. I now have the bottom of a mold! I then found another socket that was a tight fit in the Princess fly center hole and found a large bolt that would fit through the square drive in the sockets. The top of a mold now exists too. A quick brush over with cooking oil as a release agent, then mix up the aluminium loaded epoxy, then pour in & drop top fly on. The thickness will be about 5mm over, so can be cut down to size. The epoxy takes 8 hours to set at room temperature, so I stuck the whole 29kg lump on the (leccy) cooker and turned the ring on full. How much heat does the iron take !!! After 15 mins the top surface was still cool ! Despite the weird smell the whole lot was solid in 2 hours, though handling the flywheels was very funny for at least an hour afterwards. Bottom line is I now have a light lump of stuff with the v8 crank bolt pattern in one end & the princess bolt pattern in the other. From this it will be easy to measure & design a sensible adapter!! While waiting for the epoxy to bake I fitted the piston rings & built up the bottom end. ** Problem! ** Cyl no.5 had been low on compression, which is why I got a ring set, the cause was that the top ring had broken and made 2 holes between the 1st & 2nd ring seat. *iffy plan*. The gaps were not too big so I filed the slots back into shape and stuffed the new rings on anyway. If it fails again then the worst that happens is that a broken piston is scrapped and a free block gets a stuffed bore. The no.5 bore on the engine the piston came from has no marks on the bore?? so I guess the bore is loads tougher than the margarine pistons!. Pics of rebuild bits + the making of the epoxy adapter 10th November, Action! Well, limited action really, by recent standards quite a quite weekend. I needed to shorten the epoxy flywheel adapter and considered a few options, like grinding or sanding, but concluded that the best way would really be to turn it down on a lathe. Which I don't have. Or at least I didn't ;-) Yes, children with only 20 mins, a large electric motor, a pulley, a fan belt and a spare V8 bottom end, a slightly functional device was constructed. First screw the electric motor to the floor of the shed, then fix the pulley onto the output shaft. Then place the V8 block upside down next to motor. Loop a fan belt from the motor pulley to the crank pulley, then use some spare bits of wood to space the V8 & leccy motor. Refit the flywheel to the V8, stand back, apply 240v. All spins with a satisfying level of 'industrial revolution' danger ;-) Cut power, then proceed. The epoxy adapter was then tapped back into the flywheel recess until sitting flush against the flywheel bolts, seems the epoxy has expanded a little since it was cast last week, perhaps it did continue to cure for a while afterwards...... Anyhow, the 'lathe' was spun up and the adapter cut down to 22mm thick. The finished adapter pushed snugly over the tail of the V8 crank in the 'proper' engine and the Princess flywheel sat on the end, in about the right place. The spacing of the bolts on the V8 crank is a 'bit funny' as the 6 bolts share the same PCD (about 59mm), but they are not set evenly around it. The spacing is 55°, 60°,61°, 59° ,60° & 65°. The Princess has 6 bolts on a 70mm PCD that are equally spaced at 60°. This means that 4 of the holes are radialy in line but about 5mm further out. For the prototype build these four holes in the flywheel were slotted towards the center to allow the bolts to line up and the flywheel to at last be bolted onto the crank !!!!! Now I have the real measurements I hope that in a couple of days I will have a finished design for the adapter. Pics of 'DIY lathe' & flywheel stuff 11th November, HAPPY BIRTHDAY * * * * V8 MINI PROJECT ONE YEAR OLD * * * * 13th November, Research/Resources or something ? Andy seems to have found an engineering company who can make up some prototype bits for us, so a design for a real metal crank-flywheel adapter has been done. Once this is fitted then the exact locations for the block-box adapter can be finalised and that adapter will be ready for cutting. Again Andy has come up trumps with access to suitable sheet cutting and hopefully materials :-) ** NOTE dimensions may change Dec '00 **14th November, Hardware. Ordered some bits from RPi that are not essential to the conversion. Technically as the conversion could continue without them I can keep them out of the £500 budget, but will add a section for 'optional extras'. As the standard single row timing chain is a bit weedy (the cam sprocket even has plastic teeth!) I am upgrading to an adjustable duplex set. While I could have got away with just a new simplex chain it seemed a bit off to spoil the ship for a ha'porth of tar (or epoxy equivalent). Then there was the camshaft which from some angles could be considered as just about having a teeny weeny little bit of wear, probably.. So after much deliberation I bought the hottest cam that RPi sell, the Piper 285, a nice fluffy little 296 degree jobbie, which should be fun :-) Hopefully it will reduce some of the low end torque to help pulling away, however there have been some concerns that it may all get 'a bit exciting' when the cam comes in at about 2000rpm. 18th November, Action. Started to decoke the heads, but found the carbon was going to be difficult to chip off the aluminium without scratching the chambers. So off to the cleaning cupboard for some chemical warfare materials. The heads were covered in a nice foamy coat of Mr Muscle then left to stand for 30 mins, after which time most of the carbon and oil could just be rinsed off with hot water and a paint brush. The more stubborn stains required the use of the pressure washer, which also did a splendid job of blasting debris from the oil and waterways. The valves were delicately attacked with a cup type wire brush in the angle grinder until nice and clean. Then all the bits were dipped in clean oil to keep the moisture off until I rebuild the heads next weekend. Then got started on the main job for the weekend, which was to get the bottom end into a state where the gearbox could retain oil. I made a test oil pickup pipe by soldering a bit of 15mm flexi copper B&Q heating pipe to the first inch of the old pipe, then used a jubilee clip to attach a strainer made from fine gauze. It took a fair bit of wiggling and bending to get it to miss all the vital rotating bits, but I now have something as a template for a proper steel one. A bit of 3mm aluminium plate was cut to make a flange for the end of the gearbox, due to the shape of the original casting some aluminium epoxy was needed to fill a gap of about 20mm x 2mm x 10mm. The front of the V8 sump was chopped off with the jigsaw, then welded onto a bit of 1.5mm steel that was cut to fit the above flange. The gearbox can now retain oil and the engine can suck it up :-) Pics of sump bits & head cleaning 24th November, Action. Due to enthusiasm (or insomnia) I got up at about 5am and started cleaning all the nuts & bolts and sundry other little bits. Then at a sensible hour (6am) went to the shed to start fitting things together. New cam, followers & timing gear were installed and checked, then the heads & rocker gear went on. Seems that the gap on the lifters is a bit high due to the composite head gasket, but I will check again after the head has been torqued fully for a couple of weeks. To help keep things clean I bolted on the inlet gasket, and the modified manifold & DCNF, not because I want it to look finished - honest :-) Next game was to get the front cover to fit, unfortunately there is very little material on the bottom of this, so it had the minimum 1.6mm removed and the block/box adapter was shortened flush with the end of the box instead of looping under the front cover too. I also started looking at options on mounting the relocated starter motor, but nothing conclusive decided yet. 26th November, Action. I helped Damian (V8 Imp) strip down & collect his engine. Bores & rings looked good, still showing X-hatch hone marks, but the bottom end bearings, cam & followers were all very worn. Then there was the oil (though this is a loose term), quite a bit of sludge. We guess that the previous owner had only driven about in idle, but never changed the oil. Or maybe just put raw crude in ?? Also had peep at his TVR engined SD1, which makes very nice noises. There will soon be a web page with pics & sounds from Damians conversion. |
|
NOTE AVI files compressed with the DivX codec, free from www.divx.com Diy
fuel injection by MEGASQUIRT For General V8 info try http://www.v-8.org.uk/forum/ For sensible Spag stuff visit www.spagweb.com or for madtech mayhem try www.magicspanner.co.uk
Looking for more Mini info ? Then try the Internet Mini Encyclopaedia www.ime.org.uk
Norfolk n Goode Pies, Your Favourite Farmyard Faces In Tasty Pastry Cases. http://www.norfolk-n-goode.co.uk
This page last modified 04/02/2008. |
 www.msefi.com